Make your own 4x5 developing tanks
Film processing tanks for 35mm and 120 roll film are readily available, but for large-format 4x5 sheet film, options are limited.
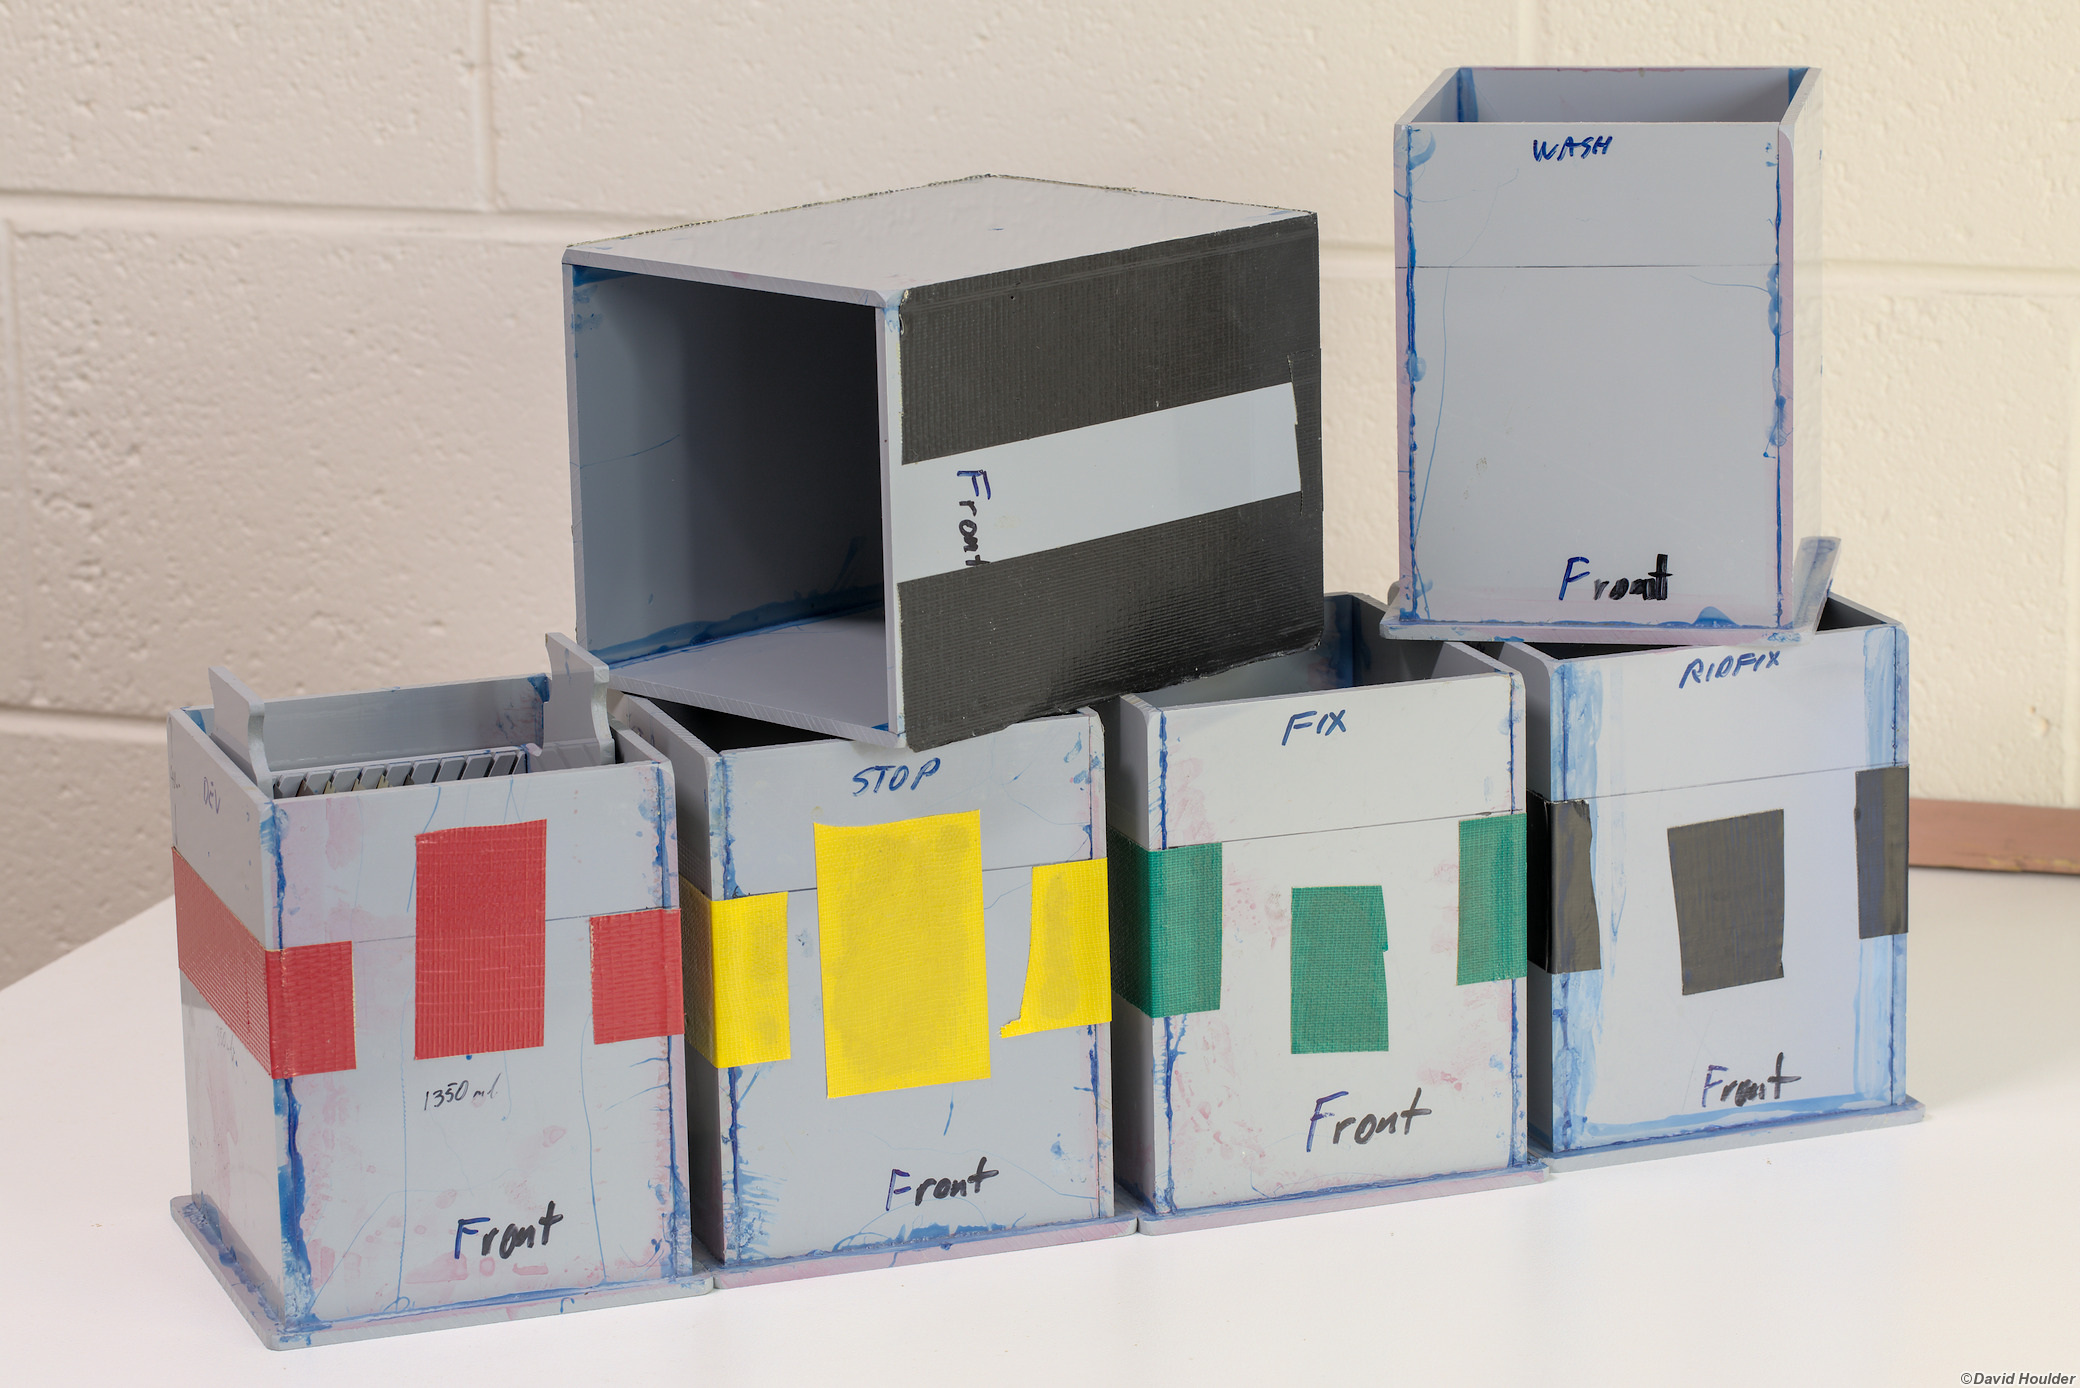
These tanks are made from readily obtainable sheet PVC and are reasonably easy to build. There's a carrier with curved slots in it that holds the film sheets, a bunch of tanks for processing, and a lid (seen above sitting on top of the "stop" and "fix" tanks) which fits over a tank, with enough headroom for the film carrier. It isn't a "daylight" system — you have to do most of the processing in the dark — but if you make sure the lid is light-tight you can turn on the room light between agitations.
The tanks and the lid are made of 4.5mm PVC and glued together with PVC solvent glue that plumbers use for assembling PVC pipes. The film carrier slots are made from 3mm PVC. I used gaffer tape to colour-code the tanks.

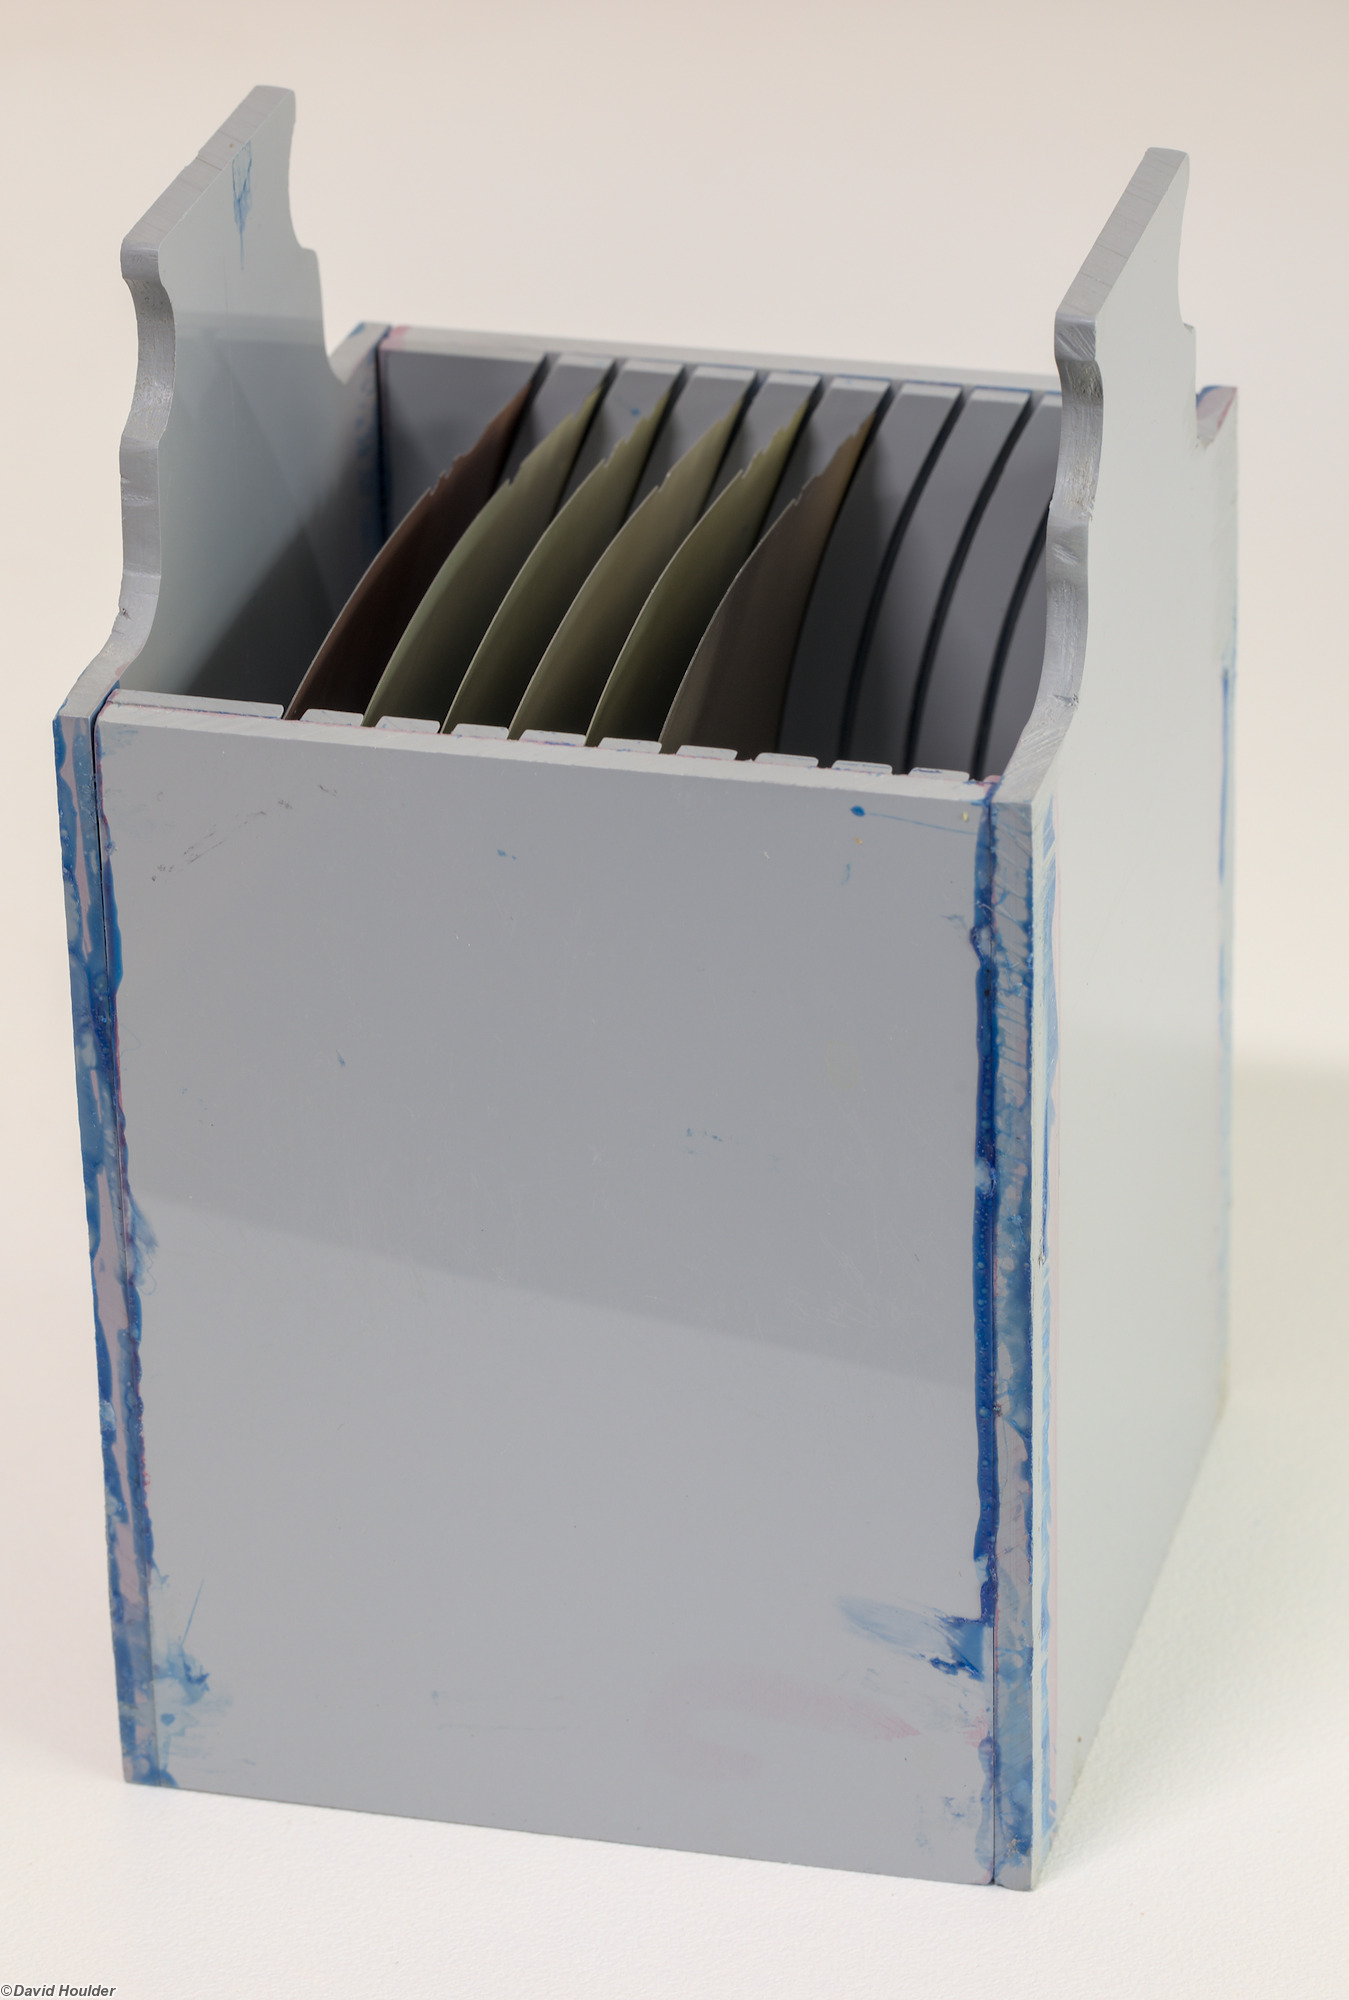
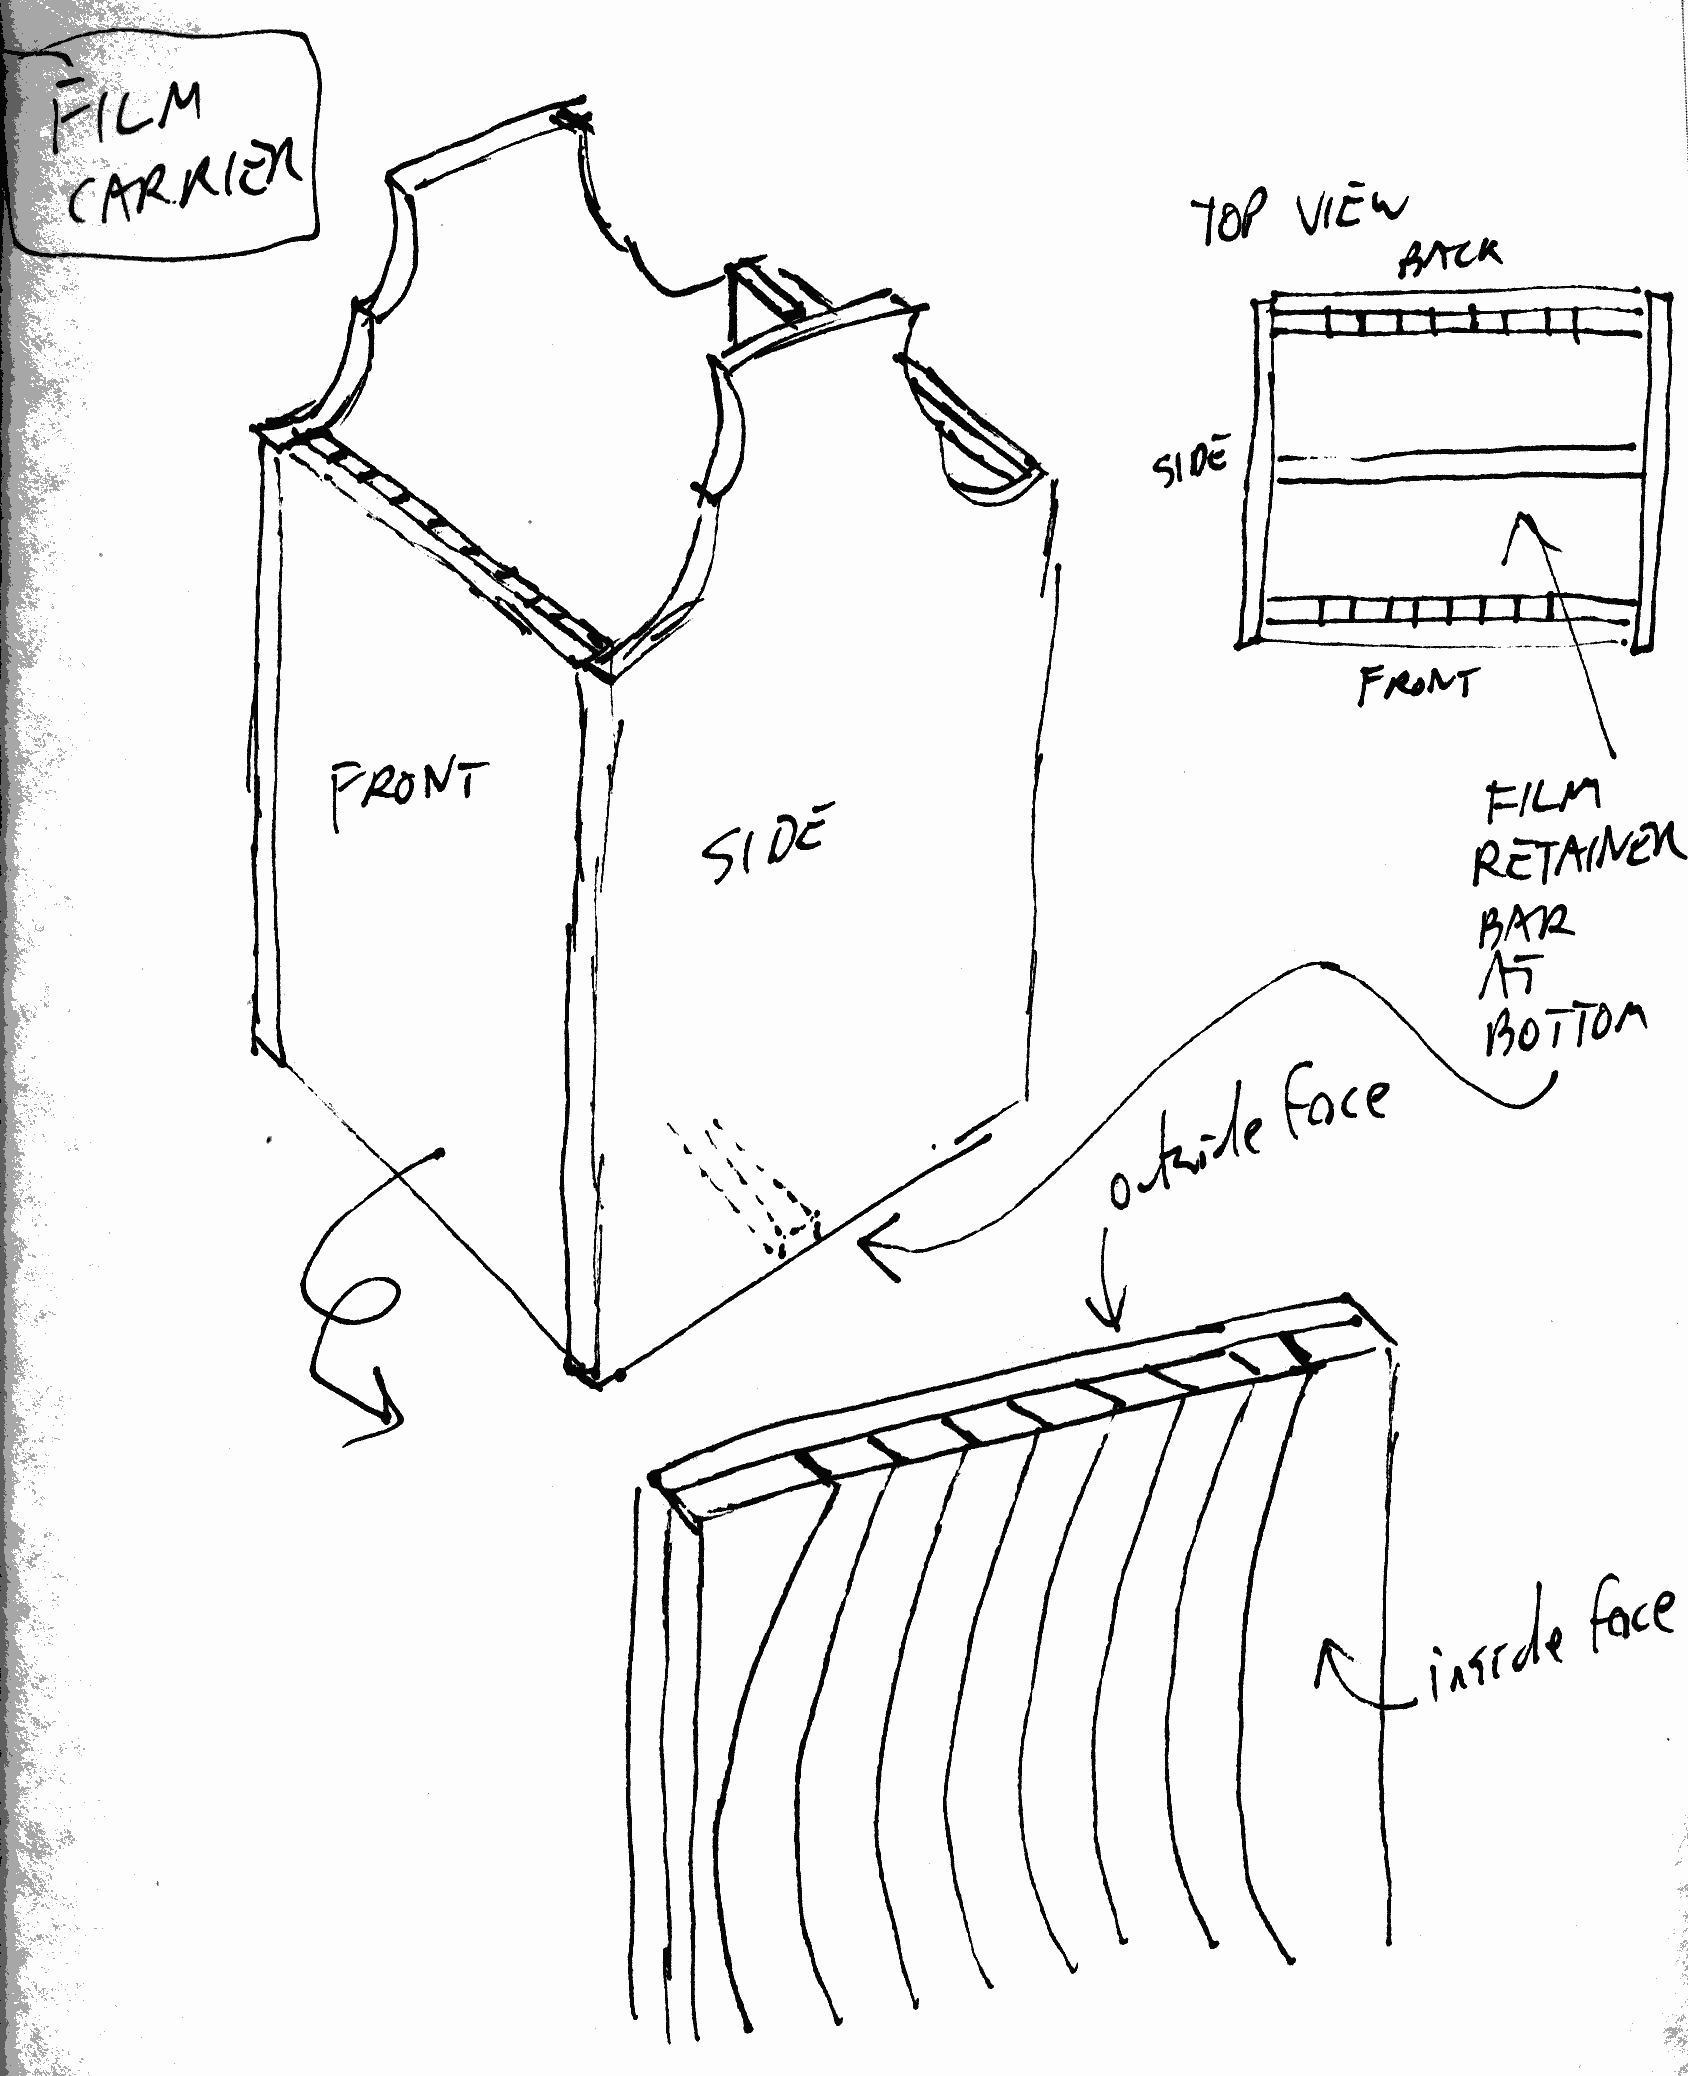
Looking down at the film carrier. At the bottom of the carrier you can see the retainer bar that stops the film falling through.
Usage 🔗
I've used these tanks to process black-and-white film (usually TMX in TMAX RS, but also various other films in Ilford Plus), and the development seems to be pretty even and consistent.
With the lights off, load the film carrier. You might want to practice this step with some dummy film first. It's not particularly difficult, but you need to keep track of how many sheets are loaded. To position a sheet in its slots, start with the film sheet at the left end of the carrier in the image above, with the bottom edge of the film touching the top edge of the carrier. Drag it towards the right hand side. You will hear and feel small clicks as the film encounters each pair of slots. Stop when you reach the desired pair of slots and slide the sheet in until it hits the retainer bar at the bottom of the carrier.
Drop the loaded carrier into the empty wash tank, and then put the lid on it. With the lid on it, the tank should be light-tight.
Turn on the room light and get all the chemistry ready. For timing, I used an audio timing track, which is just a recording of me announcing the time and other instructions (e.g. "Timing sequence for film X in developer Y. Time starts in thirty seconds… Time starts now… Thirty seconds… One minute… One minute thirty seconds… … … Seven minutes, thirty seconds… Development stops in ten seconds… Development stops, Stop bath starts in ten seconds…" and so on). As a backup I have an electronic timer that also counts down the time and then beeps, so if something goes awry with the playback I can probably estimate the agitations and still get a good result. You could probably record the track on your phone, but you need to make sure the phone stays completely dark under all circumstances, and there's the risk you may get film chemistry on it, so a cheap USB-stick MP3 player may be better.
With the lights out, start the track playback, and when it says go, lower the carrier into the developer. Agitate it by raising it, tilting to one side, lowering, raising again and tilting to the other side over about a 10 second interval. Do the development, stop bath and most of the fixing time in the dark. After about 3 minutes in the fixer you can probably turn on the light. Wash, ridfix and photo-flow in room light.
Construction overview 🔗
The most fiddly component is the film carrier. You can see most of the salient features in the photos above, including the retaining bar at the bottom of the carrier. It's a thin strip of PVC at the bottom of the carrier that stops the sheets falling through. It runs down the middle of the opening, perpendicular to the film sheets.
The curved slots are important: If they're not curved the film tends to flop around in the chemistry and can come adrift or touch other sheets. This system holds the film really securely — I've never had a failure with it. The hard part is making the slots. I made up a simple jig for my jigsaw that let me swing it in an arc of radius 150mm or so. Using that I cut curved slots into a piece of 3mm thick PVC to form a sort of "comb". In other words, the curved "fingers" remained attached at the far end of the cuts. I cleaned up the cuts with some sandpaper, then glued the two combs to the unassembled inside faces of the non-handle sides of the carrier. After the glue had set I cut off the "body" of the comb, leaving the fingers glued neatly to the sides.
I also filed notches into the top of each tank - one notch for the developer tank, two notches for the stop bath tank, three for fixer and so on. This is quite handy if you ever mix up the tanks in the dark. It's probably worth gluing some feet onto the tanks too so that they don't stick to your darkroom sink when it's wet.
Construction details 🔗
- All dimensions in mm.
- Material is sheet PVC
- You'll need
- A jigsaw
- Clamps
- PVC solvent glue
- A saw for cutting PVC (or get a shop to cut the pieces to size)
- Sandpaper
- Some pieces of plywood, MDF or other scrap timber to make the jig for cutting the curved film guide slots
- Some way of attaching the jigsaw to the jig arm. I used a couple of small bolts. Double-sided tape might also work.
- A small bolt or screw to use as the jig arm pivot.
- At least 2 sheets of 4x5 film to use as spacers when adjusting the film carrier width.
Cutting list 🔗
| Film carrier | ||||
|---|---|---|---|---|
| quantity | thickness | height | width | |
| sides | 2 | 4.5 | 168 | 110 |
| front, back | 2 | 4.5 | 128 | 93.5 |
| film guides | 2 | 3 | 180* | 180* |
| film retainer bar | 1 | 3 | 8 | 93.5 |
| Tanks (total of 5) | ||||
| quantity | thickness | height | width | |
| sides | 10 | 4.5 | 148 | 123 |
| front, back | 10 | 4.5 | 148 | 107.5 |
| bottom | 5 | 4.5 | 127.5 | 134 |
| Lid | ||||
| quantity | thickness | height | width | |
| sides | 2 | 4.5 | 174.5 | 134 |
| front, back | 2 | 4.5 | 174.5 | 118.5 |
| top | 1 | 4.5 | 125 | 118.5 |
*The sheets that become the film guides need to be a fair bit bigger than their final size so that the slots can be cut into them easily. They finish up having the same dimensions as the front and back of the film carrier.
Making the tanks and lid 🔗

Assemble the tanks and the lid as shown in the drawing. The solvent glue sets fast, so do a dry-run first, holding everything together with tape. Make sure you get the edges and faces right, and measure the internal dimensions to make sure that the lid will fit over the tanks and that the film carrier will fit inside the tanks.
When the glue sets, sand off any rough bits and sharp corners, File notches in the top of the tanks so you can tell them apart in the dark, and colour code them with tape. Check that they're water-tight and light-tight. Any light leaks can be fixed with gaffer tape or more solvent glue.
Making the film carrier. 🔗
First you'll need to make a jig for your jigsaw that lets you swing it in an arc. I used a radius of 136mm. See the drawings below. I bolted the jigsaw to the jig arm, but you could probably use double-sided tape instead.
To make the guides you cut 8 to 10 curved slots into the 180x180 sheets, with a distance of 8mm between each cut. My original model has 10 slots, but the last one is close to the handle which makes that slot harder to load. Use a jigsaw blade that leaves about a 1mm cut. The cuts need to extend the entire height of the film carrier (128mm), and you probably want to make them a mm or two longer just to be sure. The centre of curvature has to be about halfway down the film carrier too, so align the sheet on the jig so the pivot point of the arm is about 60mm up from the bottom edge of the sheet. Clamp the sheet to the jig baseboard, and move it along 8mm for each cut. Clean up the cuts with sandpaper. The film has to slide easily through these slots.


Once you've cut the "combs", glue them to the front and back pieces of the film carrier so that the front and back form a symmetrical pair that you can feed sheets of film into from the top. Note that the rightmost slot in the diagrams is not hard up against the edge of the front face - there has to be enough space so that you can get a sheet of film past the handle and into the rightmost slot.
Don't use too much glue or you'll risk filling up the slots with the excess, and make sure it's evenly spread so that every "finger" is securely bonded to its panel. You'll probably want to clamp or weight these while the glue sets.

Once the glue has set, cut off the pieces of the combs that lie outside the edges of the front and back pieces they're glued to. Clean out any excess glue and any remaining rough edges from the slots with sandpaper. You can now cut a fancy handle into the top of the film carrier sides if you want (see photo), or maybe just drill a big hole through the top of each so you have something to hold on to easily.
Carrier assembly
The final tricky part is getting the distance between the front and back just right so that film fits snugly between them — not too tight, or it will be hard to insert the film, and not too loose or you risk the film popping out during agitations. To do this, get some scrap sheets of film to use as spacers. Glue the sides to the edges of the front and back pieces and while the glue is still wet, insert the sheets into the slots as you would for processing. Adjust the front-back depth so that the sheets slide in and out OK, and leave it to dry. You probably have a few minutes to adjust this before the glue gets too viscous to allow further adjustment. When the glue is completely dry, take the sheets out and check that they still slide in and out smoothly. You can probably deepen the slots with some sandpaper if they bind a bit.
All you need now is something to stop the film falling right through the bottom of the carrier. Glue the retainer bar between the two sides at the very bottom of the carrier as shown. That's it!